

How The Last Taxi works
- Finding a taxi: each one appears on your minimap and map once you are close. It also honks its horn and flashes its lights, and GamesRadar+ notes they tend to be tucked away from checkpoints and enemies.
- Entering the dimension: interact with the taxi’s open door. You arrive in a shadowy version of New York; follow the marker into the alley beside the main road and answer the ringing payphone. The caller is Mila, a civilian stranded there.
- Choosing a taxi: after the call, head back to the street, where five to eight taxis wait in the videos we checked. Get into the one that matches the round’s rule. A correct pick plays a short scene with another green light on the traffic signal. A wrong one flashes red and costs only that attempt — the lights you already earned stay green. Three correct picks send you back to Manhattan.
- Enemies: some dimensions spawn Hiss after the phone call, and GamingAlly says the Unknown taxi itself is guarded by a wave of enemies you must clear first.
- Order: GamesRadar+ and GamingAlly both say the taxis can be done in any order.
The puzzle a taxi gives you is not tied to its zone. ShowGamer says the seven puzzle types can appear at different taxis for different players, and Sportskeeda’s round-by-round rules for its Central and Underpass taxis match different puzzles from the other guides. The solution to each puzzle type stays the same wherever you meet it, which is why the solutions below are sorted by what you see.
Taxi locations at a glance
| Zone | Where the taxi is | Landmark or route | Before you go |
|---|---|---|---|
| Downtown | In a traffic jam at the north end of a road | Inside the Deserted Area: cross its wall, then follow the main road north | Reach to grapple over the wall |
| Central | In an alley behind a warehouse | Go past the FBC Field Office towards the Patterned Factory | Nothing specific reported |
| Evacuation Zone | At the end of a dead-end alley between two buildings | Off the road from the Sinkhole to the Evac Building; Hiss Spikes and lasers inside | Elevate, or a rooftop route over the hazards |
| West Incursion Zone | Beside the Empire Avenue station, on the way to the Theater | Look for the giant red EMPIRE letters | Shift (gravity) to reach it |
| The Park | On a floor of a multi-storey car park | Climb the Mold wall beside the garage to its roof, then drop inside | None reported beyond climbing |
| Underpass | On a ledge at the edge of the research camp | After the cable car and the chasm in Recursions and Iterations | Story progress in Recursions and Iterations |
| Unknown | On a road on the Evac Building island | Southern part of the zone; face the Evac Building and look down the road to your right | Progress in Pope’s Research (and, per ShowGamer, Sever the Hedron Links) |
Each taxi’s location is given by at least three of the four written guides listed under Sources; some landmarks and routes come from a single guide. Where the guides describe a route differently, the zone section says so.
Downtown taxi location
Where: the taxi sits in a traffic jam at the northern end of a road. ShowGamer places it inside the Deserted Area, which is walled off from the rest of Downtown; GamingAlly and Sportskeeda describe the same jam as being in the eastern or northeastern part of Downtown.
Route: cross the wall into the Deserted Area — TheGamer and Gamer Guides both use Reach to grapple over it — and follow the main road north. The taxi is among the stranded cars in the northernmost stretch — GamingAlly says right at the head of the line — and its yellow paint stands out from the abandoned vehicles around it.
Video: Geeky Pastimes marks the Downtown taxi at 11:30 and its puzzle at 11:47. All four written guides report the roof sign puzzle here.
Central taxi location
Where: in an alley behind a warehouse near the Patterned Factory. GamingAlly puts it west of the factory; Sportskeeda puts the alley northeast of the FBC Field Office. GamingAlly notes the alley has no Hiss Spikes.
Route: ShowGamer’s route starts by going through the building to the right of the FBC Field Office into the Patterned Factory side of Central. Take the first proper road on the left and follow it to a stationary truck parked as if turning into another street; the taxi is near the bottom of that street. GamingAlly instead takes the second street east of the Field Office north and cuts through a warehouse. Both end in the same alley.
ShowGamer adds that this spot is close to the factory from the Crossing the Threshold side story, so check your map first — the taxi may already be marked.
Video: Geeky Pastimes marks the Central taxi at 8:58 and its puzzle at 9:24. Three guides report the taxi lights puzzle here; Sportskeeda’s Central rules differ, so check the first round.
Also in Central: the Wear ’Em & Wash ’Em laundromat hides a Secret Hideout behind a row of washing machines. Our laundry puzzle solution gives the full machine combination and the Health Upgrade it unlocks. Factory Station, one of the subway stops in the Power Lines quest, is behind the same factory; see the Factory Station calibration puzzle. The Central Mysterious Dog is on a rooftop just north of East Park Station, with her toy in the laser alley below — see the Central dog toy route.
Evacuation Zone taxi location
Where: at the end of a narrow dead-end alley between two buildings. ShowGamer places it between the road to the unauthorised mines and the road from the Sinkhole to the Evac Building; GamingAlly puts it west of the Evac Building.
Route: take the Sinkhole-to-Evac-Building road to the stretch closest to the Evac Building and look for an alley whose entrance is blocked by Hiss Spikes. More spikes and sweeping lasers wait further in.
Before you go: the guides give two ways past the hazards. ShowGamer recommends climbing onto the surrounding rooftops and crossing above them; GamingAlly uses Elevate to glide over the spikes and a mid-air dodge to avoid the lasers. The taxi is safe to use once you reach the end.
Video: Geeky Pastimes marks the Evacuation Zone taxi at 7:01 and its puzzle at 7:27. All four guides report the flashing rhythm puzzle here.
West Incursion Zone taxi location
Where: beside the Empire Avenue station, on the way to the Theater. The guides describe the exact spot differently — GamesRadar+ on a gravity wall, ShowGamer in a small parking area behind the Empire cinema, GamingAlly inside a multi-storey car park — but all place it next to the station. ShowGamer says it is likely one of the first taxis you meet.
Route: Sportskeeda gives the clearest path. Stand in front of the giant pit leading to Empire Avenue Station, go to the building on your left and use Shift to reveal a path upward. Follow it, jump the large gap to the building with “WAV!” graffiti, then cross the rooftops until you see the giant red EMPIRE letters on the station. The taxi is right beside them.
Before you go: you need Shift to change gravity here. Because the area is reoriented, ShowGamer warns the horn can sound as if it is coming from above you.
Video: Geeky Pastimes marks the West Incursion taxi at 4:04 and its puzzle at 5:33. All four guides report the streetlight puzzle here.
The Park taxi location
Where: inside a multi-storey car park in the middle of the Park, north of the FBC Base according to GamingAlly. It cannot be reached by walking up through the garage’s normal route.
Route: ShowGamer’s route: enter the garage through its main entrance near the centre of the Park, close to the pit tied to the zone’s Resonant, and go all the way through to the road on the far side. Turn left past the structure until a large Mold-covered wall appears on your left, and climb it to the garage roof — the zone’s vendor is up there too. From the roof, drop onto the big Mold growth in the middle to reach the level below, then follow the internal road to the taxi.
GamingAlly reaches the same roof a different way: climb onto the building with the Mold Factory fast travel point, then sprint and leap across to the garage roof.
GamesRadar+ describes this taxi as on the top floor of a car park that is accessible at ground level. The other three guides all go in from the roof, so try the roof route if you cannot find a way up inside.
Video: Geeky Pastimes marks the Park taxi at 0:28 and its puzzle at 1:11. All four guides report the Mold repair puzzle here.
Underpass taxi location
Before you go: this taxi is not reachable straight away. Play the Recursions and Iterations mission until Dylan has taken the cable car across the chasm, then keep following the relays until the research camp appears again — GamesRadar+ calls that area “Research Site... Again”, GamingAlly the Deeper Underpass.
Where: on a rocky ledge at the edge of that camp — the northeastern side according to ShowGamer, north of it according to GamesRadar+. It flashes its headlights and sounds its horn, so circle the edge of the camp until you spot it, then climb onto the ledge.
ShowGamer says you can safely do the puzzle while Recursions and Iterations is still active; the dimension drops you back in a slightly different spot nearby. You can also finish the mission, unlock the nearby fast travel point and come back later.
Video: Geeky Pastimes marks the Underpass taxi at 14:04 and its puzzle at 14:34. Three guides report the blackout puzzle here; Sportskeeda’s Underpass rules differ, so check the first round.
Unknown taxi location
Before you go: the taxi is on the Evac Building island. GamingAlly says it becomes accessible while you are doing the Pope’s Research side quest; ShowGamer says you need progress in both Pope’s Research and the Sever the Hedron Links main mission, with Pope’s Research giving the traversal you need in the Unknown.
Where: out in the open on a road in the southern part of the zone. GamesRadar+ puts it on the southernmost island, west of the Evac Building. ShowGamer’s check: stand in front of the Evac Building — facing it, the taxi is down the road to your right; facing away, it is on your left. Not every guide agrees on the side: Gamer Guides says the eastern end of the island and PowerPyx north of the building, so if it is not south, circle the island and listen for the horn.
GamingAlly reports a dense wave of enemies around the taxi that you have to clear before you can get in.
Video: Geeky Pastimes marks the Unknown taxi at 15:24 and its puzzle at 15:48. All four guides report the shadow puzzle here.
Which taxi puzzle am I in?
Use the first round to tell the seven puzzle types apart, then jump to its solution. Each has three rounds, and every round has exactly one correct taxi — in a different spot every time, so learn the cue, not the position.
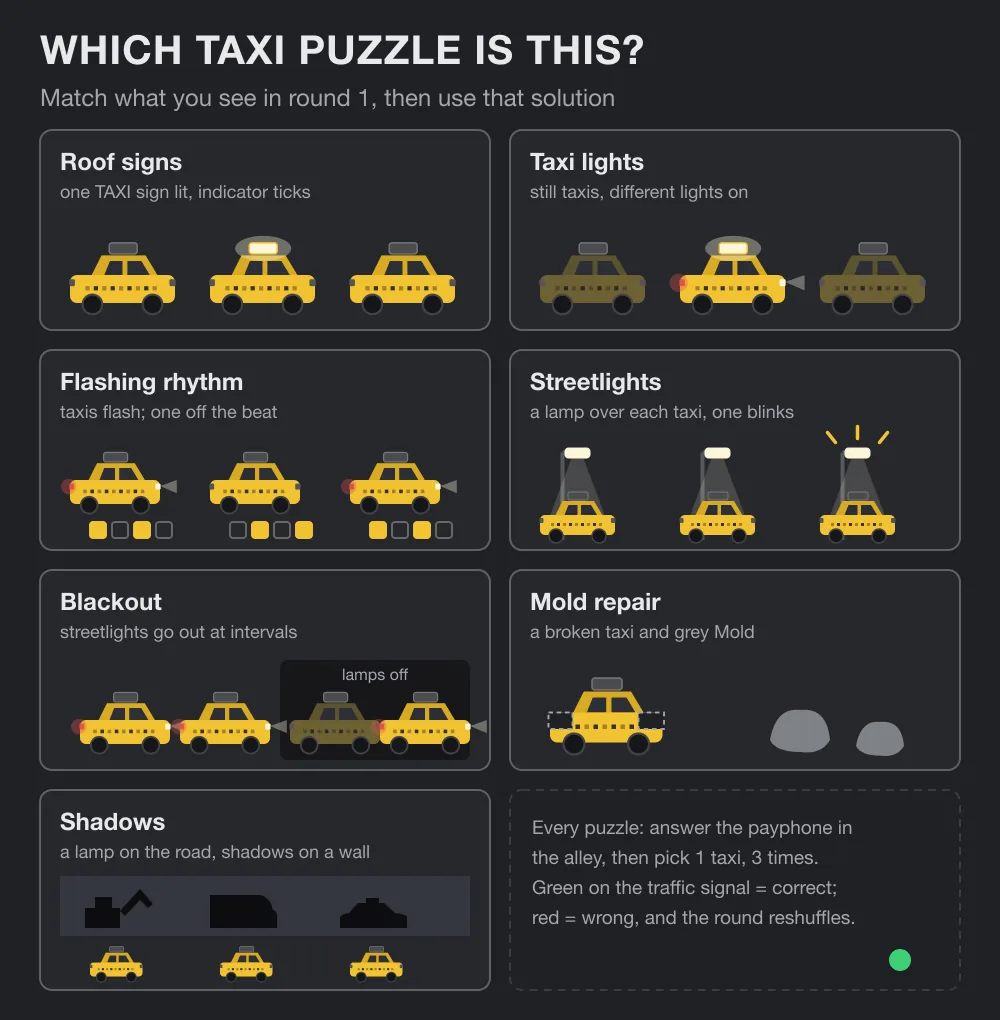
| What you notice first | Puzzle | Most often reported at |
|---|---|---|
| Roof signs that switch on or off as you walk up to taxis, or a ticking indicator | Roof sign puzzle | Downtown |
| Taxis sitting still with different lights on: headlights, rear lights, roof sign | Taxi lights puzzle | Central |
| Taxis flashing their lights in a rhythm | Flashing rhythm puzzle | Evacuation Zone |
| A streetlight above each taxi, some blinking | Streetlight puzzle | West Incursion Zone |
| The streetlights going out at intervals | Blackout puzzle | Underpass |
| A broken taxi and grey Mold growths | Mold repair puzzle | The Park |
| A portable light on the road and shadows on the wall | Shadow puzzle | Unknown |
Roof sign puzzle solution
Watch: the lit TAXI sign on each roof, and listen for an indicator ticking. In later rounds the signs react as Dylan walks up to the taxis.
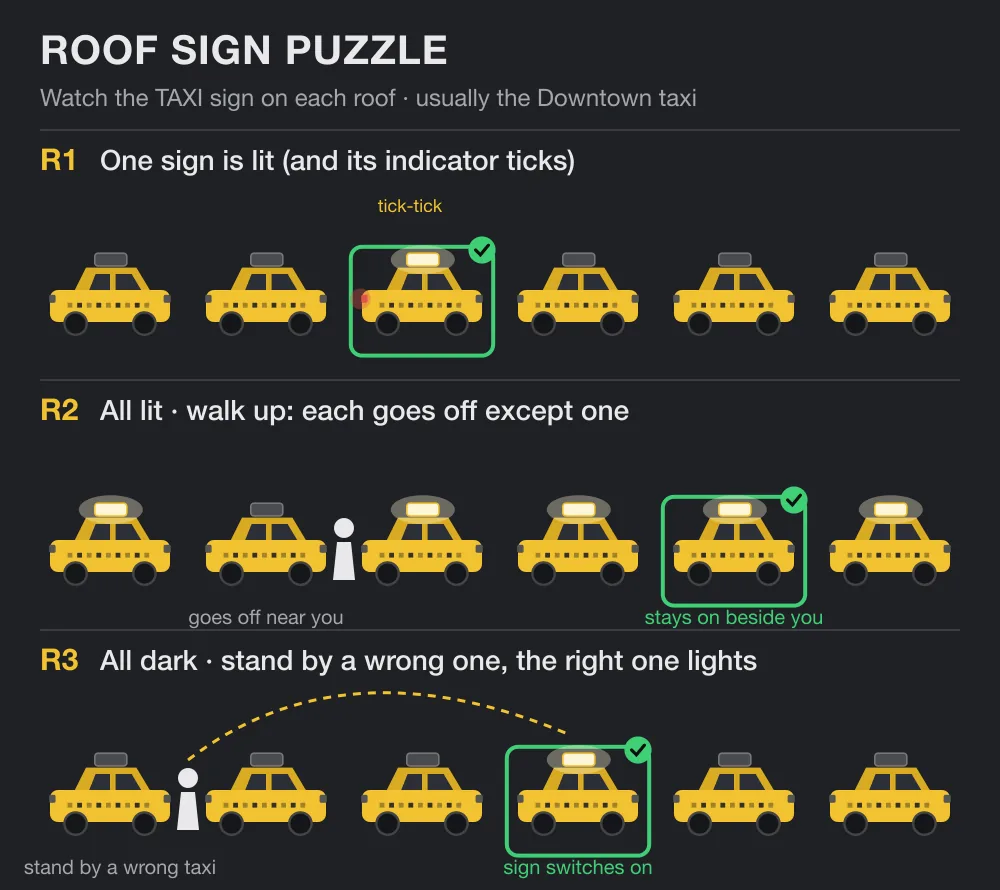
- Round 1: get into the only taxi with its roof sign lit. Several guides also hear its indicator ticking; GamesRadar+ goes by the ticking alone.
- Round 2: all the roof signs are on. Walk up to each taxi: its sign switches off as you get close, except on one taxi that stays lit even when you are right beside it. Get into that one.
- Round 3: all the roof signs are off. Stand next to any wrong taxi and the correct one’s sign lights up somewhere else in the street (Geeky Pastimes and Dan Allen footage, Sportskeeda), so turn the camera after each approach. Gamer Guides describes a sign that goes off instead; if nothing lights, look for that.
Taxi lights puzzle solution
Watch: three lights on each parked taxi — headlights, rear lights and the roof sign. Nothing flashes; you are looking for the one combination that differs.
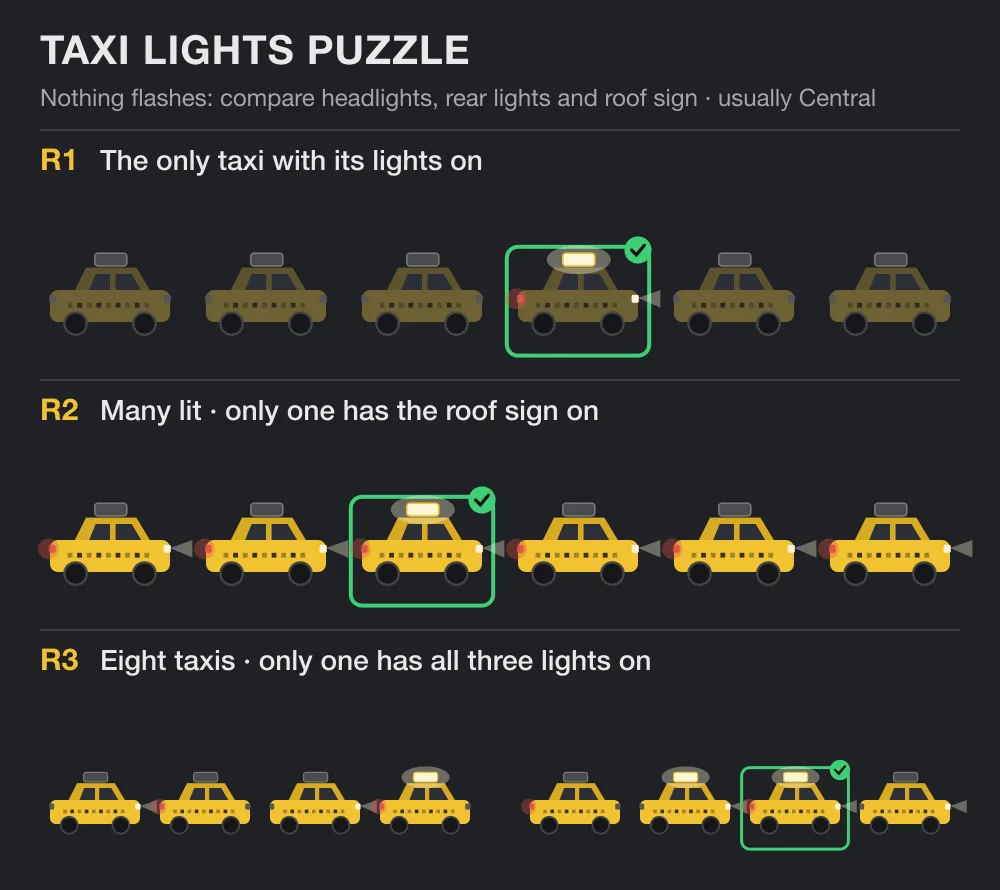
- Round 1: get into the one taxi that is lit while the others are dark. Game Rant and AllThings.How see headlights, rear lights and roof sign all on; in the Geeky Pastimes footage it is simply the only taxi with headlights.
- Round 2: find the only taxi with its roof sign lit. Other taxis may have their headlights or rear lights on, so ignore everything but the sign.
- Round 3: among eight taxis, some show only front lights and some only rear. Find the one with headlights, rear lights and roof sign all on at once; if any of the three is off, it is the wrong taxi.
Round 1 is the least consistent round in the sources: Sportskeeda’s correct taxi is the only one with its headlights off, and Gamer Guides picks the one with brake lights on. If no single taxi is lit, pick the one whose lights differ from the rest.
Flashing rhythm puzzle solution
Watch: the timing of each taxi’s flashing lights. Let them cycle a few times before choosing. Every guide and video we checked agrees on this one.
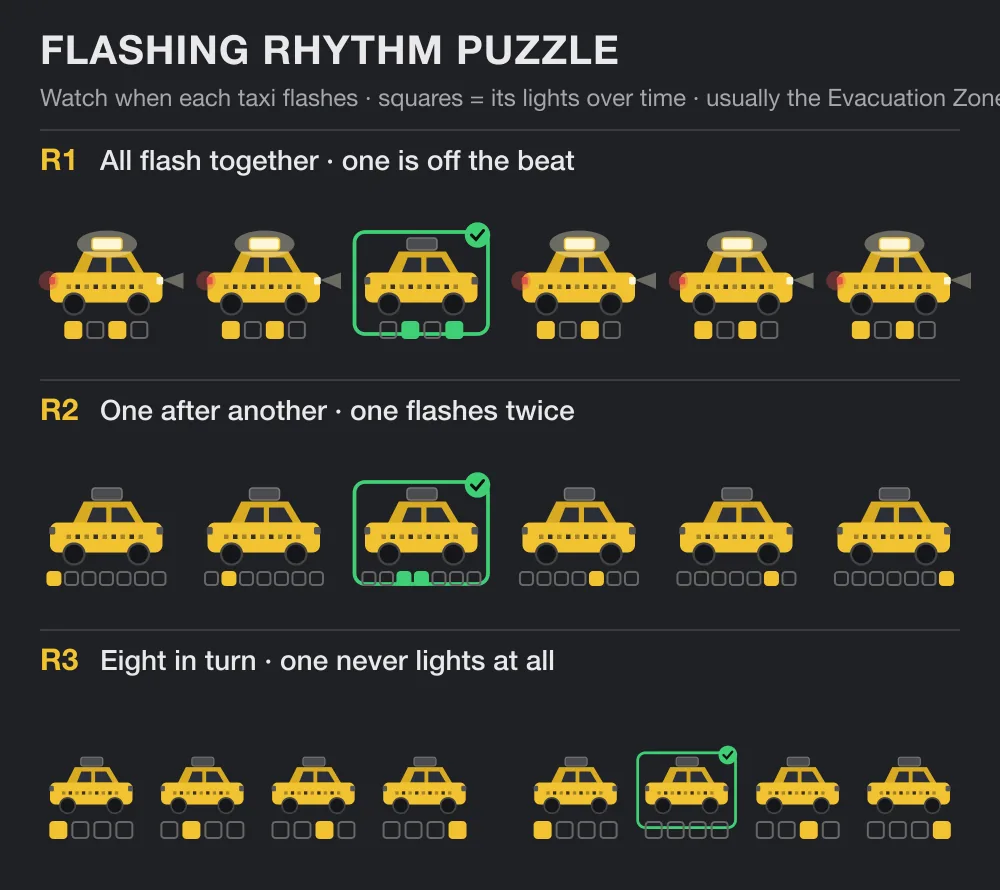
- Round 1: the taxis flash together, except one that flashes off the beat. Get into it.
- Round 2: the taxis flash one after another, once each, except one that flashes twice. Get into that one.
- Round 3: eight taxis, four on each side, light up in sequence, and one never gets a turn. Get into the completely dark taxi.
Streetlight puzzle solution
Watch: the streetlight above each taxi, not the taxis themselves. Get into the taxi under the lamp that behaves differently.
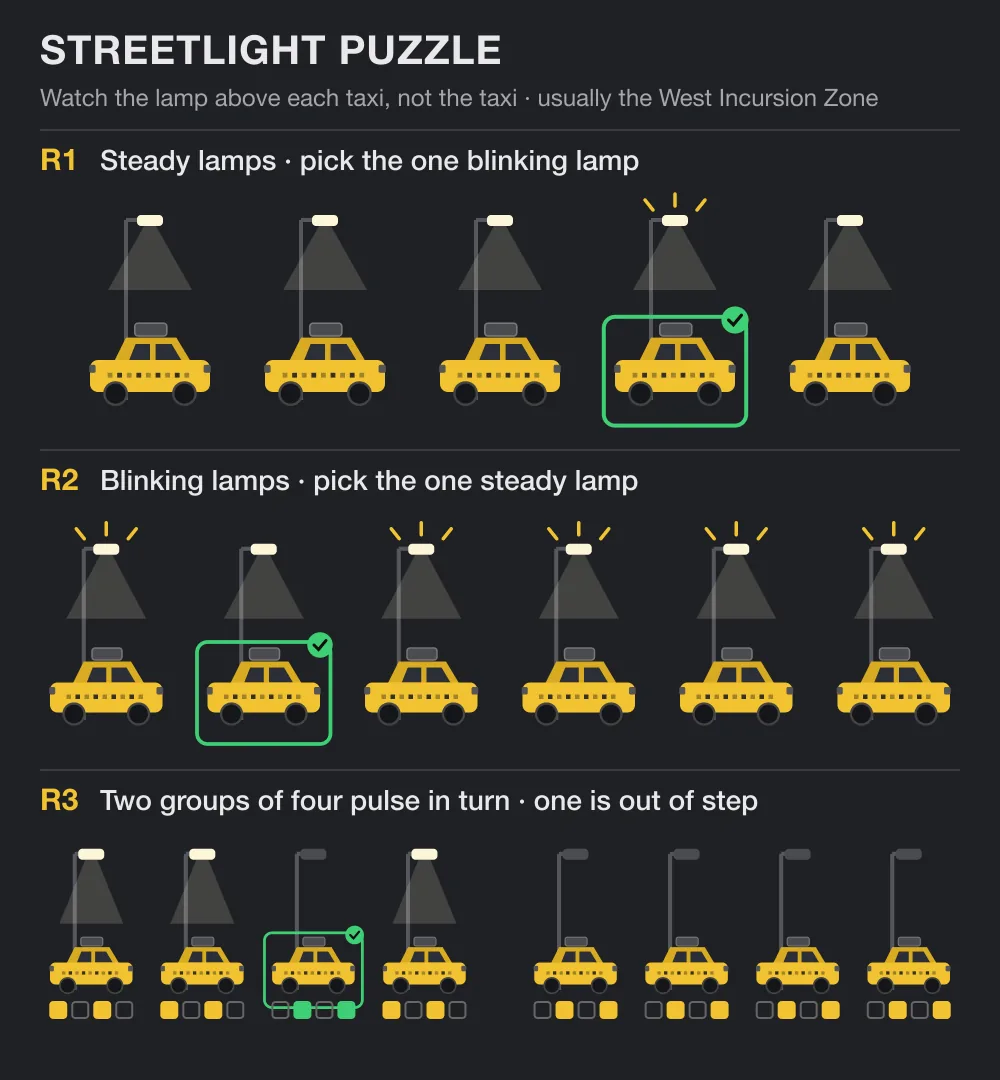
- Round 1: the lamps shine steadily except one that blinks; get into the taxi under it. Game Rant words it as the only lit streetlight.
- Round 2: now the streetlights all blink except one that shines steadily. Get into the taxi under the steady lamp.
- Round 3: eight taxis in two groups of four, and the groups’ lamps pulse in turn. One lamp is out of step with its group — lit while the others are dark. Get into the taxi under it.
Blackout puzzle solution
Watch: what each taxi’s lights do when the streetlights go dark, then when they come back. Wait through at least one full cycle before choosing.
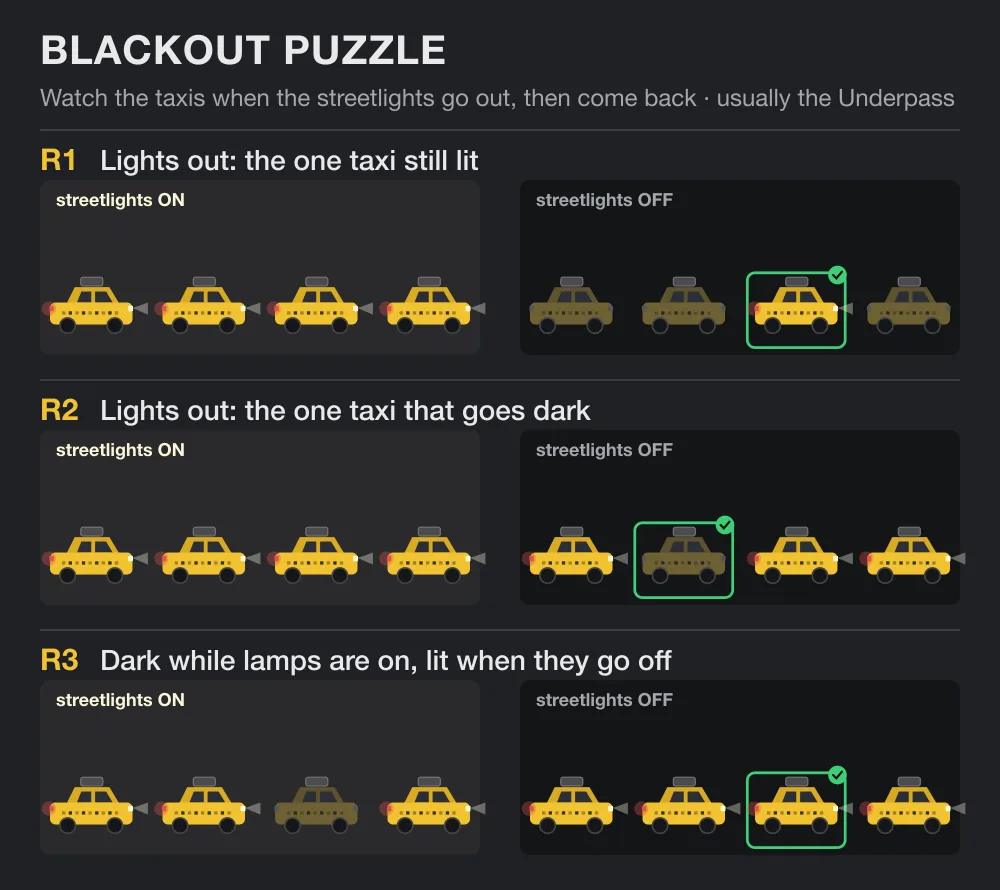
- Round 1: when the streetlights go out, only one taxi keeps its lights on. Get into it.
- Round 2: at the next blackout, the other taxis stay lit and one goes dark. Get into that one.
- Round 3: every other taxi stays lit the whole time. The correct one is dark while the streetlights are on and switches its lights on when they go out, so the two are never on together.
Round 3 as the Geeky Pastimes, Gamer Guides and Dan Allen footage and GamesRadar+, Game Rant and AllThings.How describe it. Sportskeeda and Cadaea see different patterns here — Cadaea picks the highlighted taxi without a lit roof sign when the lights return — so if no taxi behaves as above, watch the roof signs as the streetlights come back.
Mold repair puzzle solution
Watch: this is the only puzzle not about lights. You clear Mold, find taxi parts on the ground and fit them to a broken taxi before getting in. GamingAlly says a correct part attaches with a clear mechanical click; GamesRadar+ says a wrong one is set down beside the taxi or looks visibly wrong.
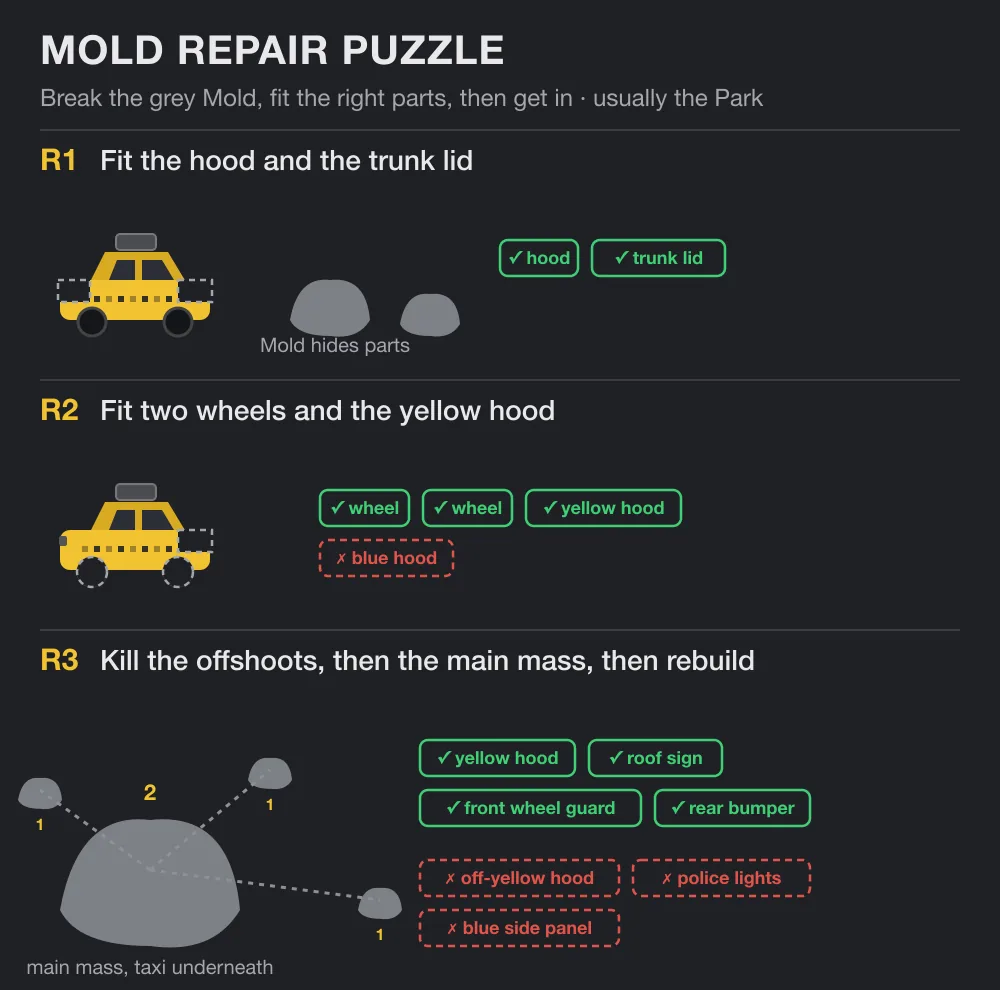
- Round 1: break the grey Mold growths around the taxi to reveal the parts, fit the hood and the trunk lid, then get in. Sportskeeda notes enemies spawn after the phone call, so clear them first.
- Round 2: fit two wheels and the yellow hood. A blue hood is also lying around; ignore it and use the one that matches the taxi’s colour.
- Round 3: the taxi is buried under a Mold mass that keeps sending out offshoots. Kill the offshoots to expose the central mass, destroy it, then rebuild the taxi: yellow hood, roof sign, front wheel guard and rear bumper. Leave the police lights, the off-yellow hood and the blue side panel.
The round 3 parts differ slightly between guides — ShowGamer and Sportskeeda add a trunk cover, and Gamer Guides says the right hood is a little further down the road. Every list includes a hood and a roof light; if a part will not click into place, it is the wrong one.
Shadow puzzle solution
Watch: shadows, not the cars. Pick up the portable light in the road and shine it at the taxis one by one to see the silhouette each casts on the wall. Most cast the shadow of another vehicle — GamesRadar+ shows one throwing the shadow of an industrial digger.
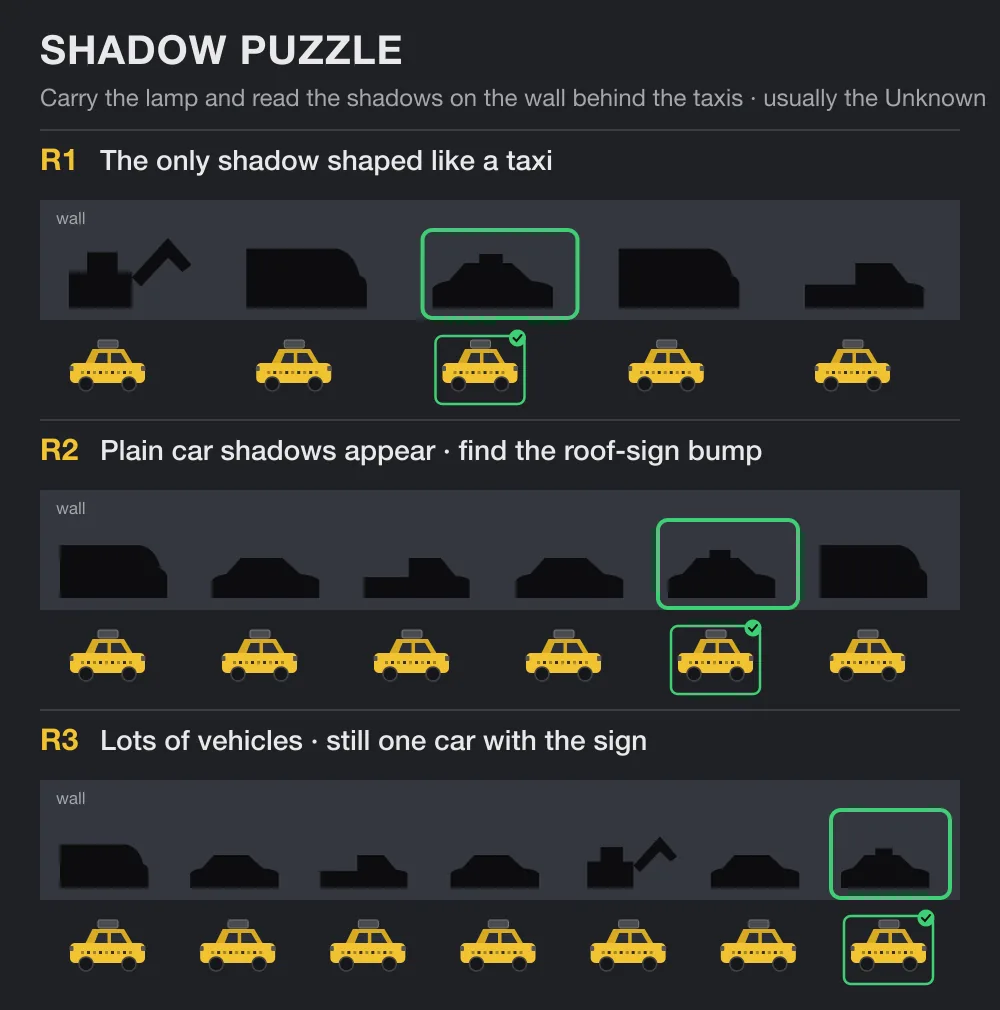
- Round 1: only one taxi casts a shadow shaped like a taxi. Get into it. Cadaea notes its tinted windows, so the taxi’s shadow is solid rather than showing window gaps.
- Round 2: more taxis, some a little further away, and now some cast plain car shadows. Get into the one whose silhouette has the roof-sign bump.
- Round 3: lots of vehicles — vans, a pickup, a digger and several plain cars. Only one car shadow carries the roof sign; get into that taxi. Geeky Pastimes finds it among a couple more taxis round a corner, so check the edges of the street.
Finishing The Last Taxi
Solving the seventh puzzle does not end the quest on its own. ShowGamer says to return to the alley beside the road and answer the ringing phone one final time; Sportskeeda describes being taken to a street where a phone is ringing in the distance. In GamingAlly’s account, Mila tells you she will take her chances and get into a taxi, and the quest closes there. Geeky Pastimes marks this ending at 17:27.
Rewards: nothing pops up when the quest closes, and GamesRadar+ and GamingAlly report no reward. Gamer Guides and TheGamer, however, found a Coffee Cup artifact that slowly regenerates health waiting in the Gap afterwards, so check there. The Last Taxi is not among the trophy-related side quests in PowerPyx’s trophy roadmap.
Patch 1.4 explains the conflict. Game Update 1.4.0 (October 1, 2026) lists “Fixed an issue where The Last Taxi quest wasn’t granting any rewards”, so players who saw nothing at launch were hitting a bug. If you finished the quest before the update and your Gap has no Coffee Cup, update the game and check the Gap again; Remedy did not say whether the fix applies to saves that already completed the quest. Full list in our 1.4 patch notes.
Video references
Two full walkthroughs uploaded on September 22, 2026 have chapter markers for every zone. The times below are the uploaders’ own chapter markers, checked on September 24, 2026.
| Zone | Geeky Pastimes: taxi | Geeky Pastimes: puzzle | Cadaea: puzzle |
|---|---|---|---|
| Downtown | 11:30 | 11:47 | 2:18 |
| Central | 8:58 | 9:24 | 0:39 |
| Evacuation Zone | 7:01 | 7:27 | 0:57 |
| West Incursion Zone | 4:04 | 5:33 | 1:23 |
| The Park | 0:28 | 1:11 | 2:00 |
| Underpass | 14:04 | 14:34 | 2:51 |
| Unknown | 15:24 | 15:48 | 3:27 |
Cadaea’s video shows the puzzles only, without the drive to each taxi. Both channels name their chapters by zone; because the puzzle type can vary between playthroughs, the puzzle in a chapter may not be the one you get at that taxi. Geeky Pastimes’ footage is the source Sportskeeda credits for its screenshots.
Stuck? Taxi puzzle FAQ
What is The Last Taxi in Control Resonant? A side quest in which you find seven supernatural taxis around Manhattan, one per zone. Each opens a dimension styled as a shadowy New York, where a stranded caller named Mila rings a payphone; after answering it you pick the correct taxi in three rounds.
How many taxis are there in The Last Taxi? Seven: Downtown, Central, the Evacuation Zone, the West Incursion Zone, the Park, the Underpass and the Unknown. GamesRadar+ and GamingAlly both say you can do them in any order.
Is each taxi puzzle always in the same zone? Not necessarily. ShowGamer says the puzzle types can turn up at different taxis for different players, and the guides do not all match the same puzzle to Central and the Underpass. Identify the puzzle from its first round and use that solution.
What happens if I get into the wrong taxi? The traffic signal flashes red instead of green, and you keep the green lights you have already earned. Cadaea says the taxis reshuffle and you try that round again; AllThings.How and TheGamer describe being sent back to the start of the street. Only choosing Abandon wipes the whole sequence, according to AllThings.How.
Why can’t I find the taxi in the right area? Get close enough for it to appear on the minimap, then listen for its horn and look for flashing headlights. In the West Incursion Zone the horn can seem to come from above because gravity is reoriented, and the Underpass and Unknown taxis need story or side-quest progress first.
Why won’t a part attach in the Mold repair puzzle? It is probably a decoy: the blue hood in round 2 and, in the final rebuild, the police lights, the off-yellow hood or the blue side panel. GamingAlly says a correct part clicks into place.
Is there a reward for The Last Taxi? Nothing pops up when it ends. Gamer Guides and TheGamer later found a Coffee Cup artifact (slow health regeneration) in the Gap; GamesRadar+ and GamingAlly report no reward. The Last Taxi is not among the trophy-related side quests in PowerPyx’s trophy roadmap.
I solved all seven taxis, so why is the quest still open? Answer the phone once more. ShowGamer says to return to the alley beside the road and pick up the ringing phone, which ends the quest.
What we have not verified yet
- Exactly what a wrong pick resets. All sources agree you keep your green lights; they differ on whether only the taxis reshuffle or you are sent back up the street.
- The rules where the sources still disagree: round 1 of the taxi lights puzzle and the variants of blackout round 3.
- How the Park car park is entered: most guides and videos go in from the roof, GamesRadar+ says ground level.
- Which side of the Evac Building island the Unknown taxi is on, and whether it strictly needs Sever the Hedron Links progress, which only ShowGamer mentions.
- The Coffee Cup artifact, which two sources found in the Gap afterwards and two others did not report — likely the reward bug fixed in update 1.4.0.
Rechecked on September 28, 2026 against the written guides and four gameplay videos listed below; the video transcripts decided the round-by-round rules where written guides disagreed. The puzzle diagrams on this page are our own drawings, not screenshots — we have not found gameplay screenshots we are licensed to reuse. The image at the top of this page is an official screenshot for illustration, not a taxi location.
Before the ending and post-game cleanup
Worried about losing access to unfinished quests? See our spoiler-light point of no return checklist for post-game access, karaoke precautions and profile backups.
Sources
- GamesRadar+ — All Taxi locations and puzzle solutions in Control Resonant
- ShowGamer — CONTROL Resonant The Last Taxi: All Taxi Locations and Puzzle Solutions
- GamingAlly — Control Resonant Taxi Locations and Puzzle Solutions
- Sportskeeda — How to complete The Last Taxi quest (locations and solutions)
- Game Rant — Control Resonant: All Last Taxi Locations & Solutions
- AllThings.How — The Last Taxi: all locations and puzzle solutions (wrong picks, Abandon)
- TheGamer — The Last Taxi quest: locations and walkthrough (Coffee Cup artifact)
- Geeky Pastimes (YouTube) — The Last Taxi Guide: Control Resonant (zone chapters for every taxi and puzzle, ending at 17:27)
- Cadaea (YouTube) — The Last Taxi ALL Puzzles Guide (No Cutscenes)
- Gamer Guides (YouTube) — The Last Taxi: every taxi and puzzle (taxi counts per round, reward at 6:14)
- Dan Allen Gaming (YouTube) — The Last Taxi: all seven puzzles round by round
- PowerPyx — Control Resonant Trophy Guide & Roadmap (Dog’s Best Friend)
Related guides
 Official · RemedyGuidesControl Resonant Dog Toy LocationsRead guide
 DiagramGuidesControl Resonant SHÜM Arcade: All Cabinet Locations & RewardsRead guide
 DiagramGuidesControl Resonant Washing Machine Puzzle SolutionRead guide
 DiagramGuidesControl Resonant Power Lines Walkthrough: Every Station PuzzleRead guide