Quest start and requirements
What it is: Power Lines is the fifth main mission in the Contain the Crisis questline (PowerPyx). It starts in Central > Field Office and unlocks after you complete Arish’s Briefing. AllThings.How describes the setup: security chief Simon Arish briefs Dylan on the Cancellation Field Device (CFD), which Emily Pope built to push back the Hiss. The CFD needs power, and that power has to be rerouted through a chain of subway stations.
Quest description (PowerPyx): “The CFD needs a lot of power. A maintenance team was sent to reroute power from the city grid through the subway stations, but they disappeared, along with an entire subway station. Arish wants me to finish the job.”
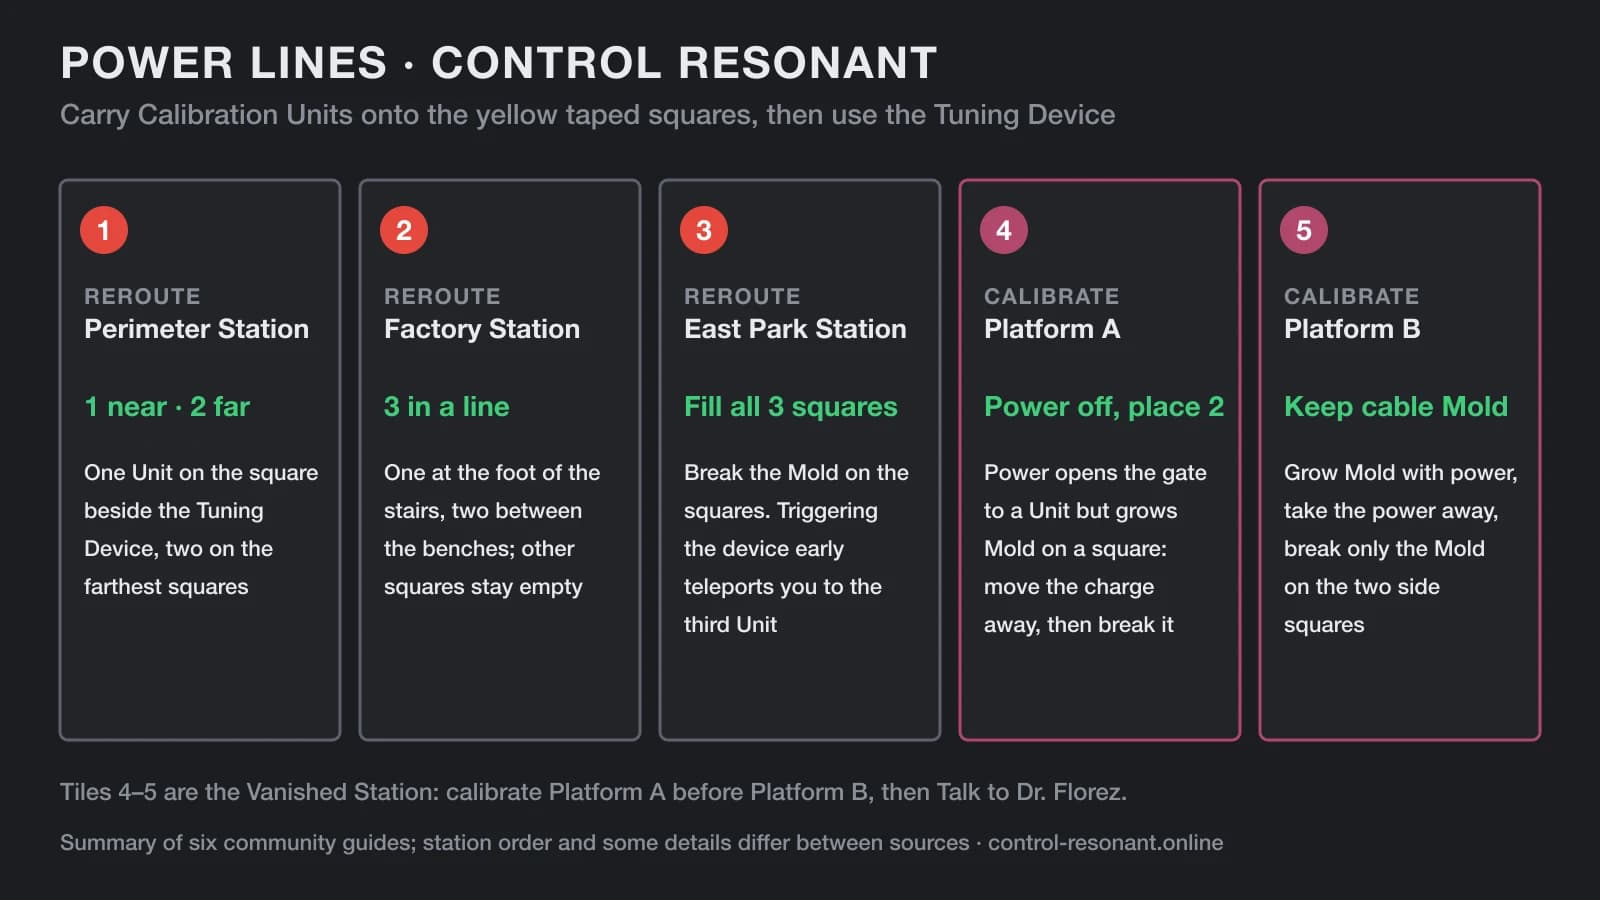
| # | In-game objective | What you do |
|---|---|---|
| 1 | Reroute Perimeter Station | One Unit near the device, two far away |
| 2 | Reroute Factory Station | Three Units in a straight line |
| 3 | Reroute East Park Station | Fill all three squares; teleport to the third Unit |
| 4 | Head to the Surface / Help the Survivors | Answer the survivors, take the tunnel |
| 5 | Reroute the Vanished Station | Collect four Units, link both platforms |
| 6 | Calibrate Platform A | Power off, break the Mold, place two Units |
| 7 | Calibrate Platform B | Keep the cable Mold, break the side Mold |
| 8 | Talk to Dr. Florez | Clear the ambush, finish the quest |
Getting there: PowerPyx says all three power stations are in the Central region, east of the Field Office area, reached through the Level 1 Clearance door directly east of the south corner of the Field Office building.
Reward: 1 Living Shard (PowerPyx). GamesRadar+ and AllThings.How also say the quest ends with a Living Shard, and GamesRadar+ adds that Living Shards unlock new weapons.
The objective list and numbering above are PowerPyx’s. AllThings.How says Simon Arish briefs Dylan at “Field Command” rather than the Field Office, and lists the reroutes as Factory, Perimeter, East Park, then the Vanished Station. The sources also clear the first three stations in different orders; none of them says whether that order is fixed. See conflicts.
How the calibration puzzles work
GamesRadar+ sums up the rule for every stop: place Calibration Units (the small devices you can pick up and carry) on specific squares marked with yellow tape, then activate the large machine, the Tuning Device. A Calibration Instructions note near each device explains where the Units go. PowerPyx adds that the Units show up as boxes on the minimap.
- Placement rule changes per station: near and far at Perimeter, a straight line at Factory, every square at East Park, two squares per platform at the Vanished Station.
- The device checks your answer: the video’s creator points out that you only find out whether the layout passes or fails when you use the device.
- Power moves by hand: a charge can be pulled out of one Power Core and carried to another. Powering a core opens its door or shutter; taking the charge away shuts it again (GamesRadar+, PowerPyx).
- Mold and light (Vanished Station): powered lights make Mold grow, and Mold conducts electricity across gaps in broken cables. You cannot clear Mold while a light is on it — it grows straight back (GamesRadar+, VGC).
The guides use different names for the same things. Calibration Units are “calibration devices” to PowerPyx and AltChar, “tuning forks” to VGC and “nodes” in the video; Power Cores are “power boxes” (PowerPyx) or “generators” (AltChar, VGC). We follow GamesRadar+’s names but have not confirmed the exact in-game spelling.
Reroute Perimeter Station
Objective: Reroute Perimeter Station.
Where: the closest of the three, down the road east of the Field Office area. The entrance is along the road on the west side of the search area; defeat the group of Hiss there and take the stairs down (PowerPyx).
Rule: put one Unit on the square closest to the Tuning Device and two on the squares farthest from it. GamesRadar+ and PowerPyx both give this rule, which comes from the note next to the device.
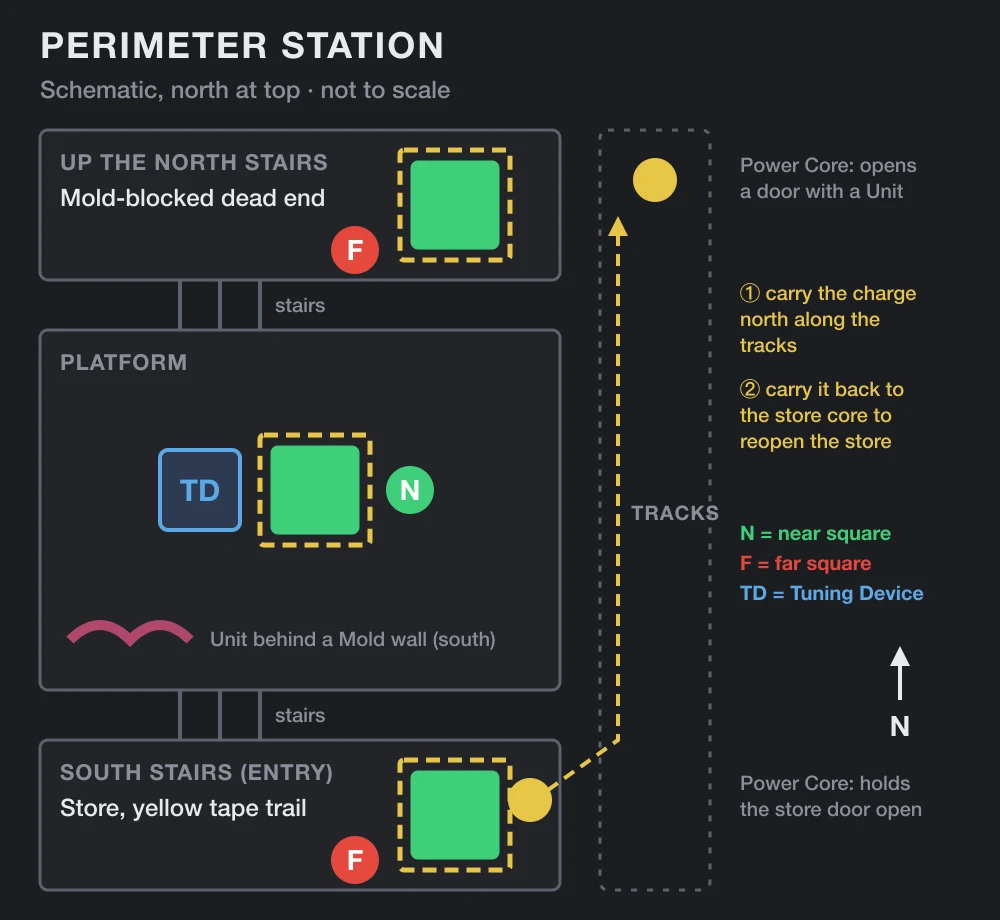
Calibration Units (GamesRadar+’s directions):
- Unit 1: on the platform, head south and look behind the half-formed wall of Mold. Carry it into the open.
- Unit 2: up the platform stairs to the north, at a dead end blocked by Mold. One of the taped squares is here too.
- Unit 3: behind a door at the north end of the tracks, opened by powering the Power Core there (step 1 below).
Placement and power:
- Move the charge north. Up the south stairs — the way you came in — a Power Core with a charge is holding a store door open. Take the charge down to the platform and north along the tracks to the other Power Core. Powering it opens the door to Unit 3.
- Bring the charge back. Carry it back upstairs to the store core to reopen the store door with a yellow tape trail leading to it. Place a Unit on the taped square inside — far square one.
- Far square two: take another Unit up the north stairs and place it on the square at the dead end.
- Near square: put the last Unit on the square right next to the Tuning Device, then use the device.
Success: if the layout is right, the light on the machine turns green and its number changes to 1 (PowerPyx).
PowerPyx walks the same route in different words: its first charge is pulled to a nearby box to open a room with a Materials crate, and its Unit descriptions (“placed near the stairs”, a dead end at the other end of the tracks, “up the stairs opposite where you entered”) do not map one-to-one onto GamesRadar+’s compass points. At the video’s first station (unnamed, but its near/far layout matches Perimeter) the creator warns that you must run while carrying the charge down “or the electricity will go”; no written guide mentions a time limit. The video also picks up an optional chest near the first power switch.
Reroute Factory Station
Objective: Reroute Factory Station.
Where: behind the Patterned Factory. PowerPyx puts the entrance along the road at the factory’s north corner, where a group of Hiss and Mold is fighting. AllThings.How says the yellow station marker sits near the Patterned Factory and the park checkpoint: follow the main road from the Field Office towards the industrial sector (a stretch of it is a minefield of floating red explosive drones), keep along the factory wall towards a wall of Mold, and look for the green-lit stairway at the crossroads at its end. AltChar adds that this is the factory where you fight the second Resonant.
Rule: all three Units in one straight line in front of the Tuning Device (GamesRadar+, PowerPyx, AltChar and the video). AltChar warns that there are other yellow taped rectangles on the platform; leave those empty.
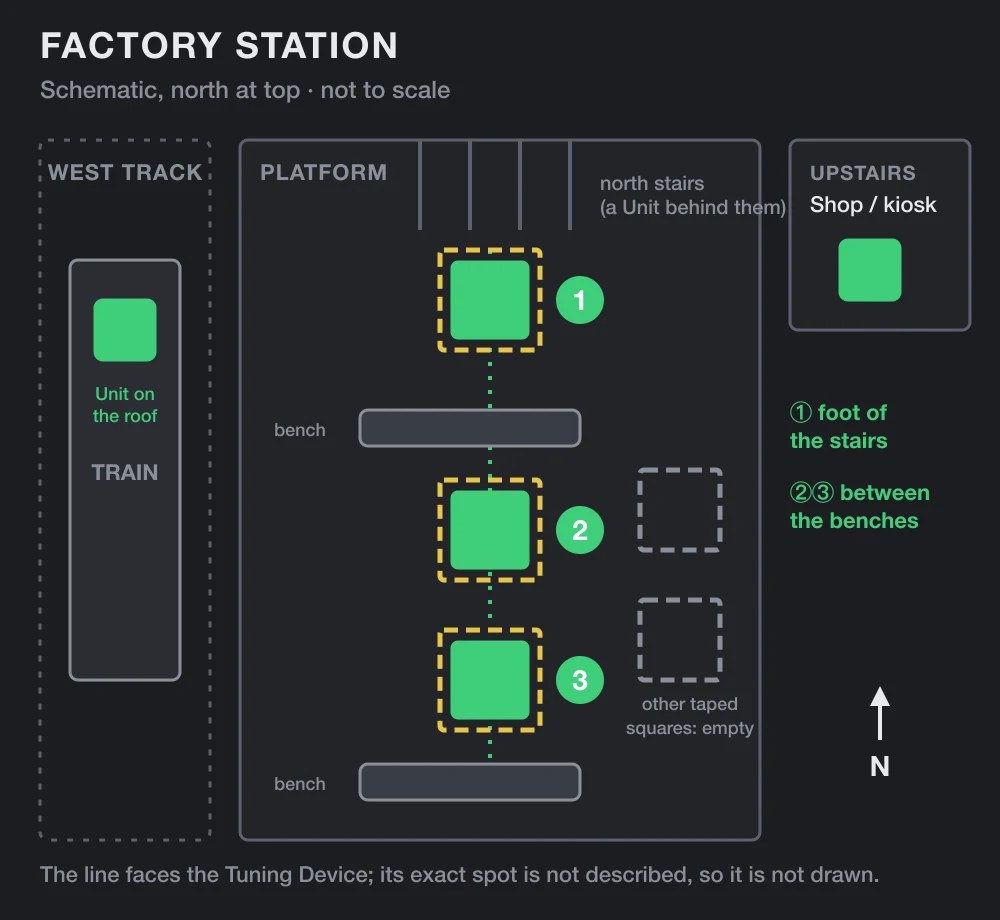
Calibration Units:
- Shop: on the way down, in an open shop or kiosk near the ticket barriers — all four written guides agree (PowerPyx: on the right as you descend).
- Train roof: on top of the parked train, on the west track according to GamesRadar+. PowerPyx says “on the train to the left”.
- By the stairs: GamesRadar+ says around and behind the north platform stairs; PowerPyx says through the tunnels under the stairs you came down. AltChar instead puts this Unit just to the left of the train carriage.
Placement and power: no charge needs moving here.
- Place the shop Unit on the square directly at the bottom of the stairs (PowerPyx).
- Place the Unit from the stairs area on the first square between the two benches.
- Place the train Unit on the other square between the benches, and check that all three form a straight line in front of the machine.
- Pull the lever on the Tuning Device.
Success: an energy surge runs through the grid and briefly drops Dylan to his knees while Zoe talks over the radio — AllThings.How stresses that this is scripted, not a hazard. AltChar describes a cutscene. AllThings.How says the objective then changes to Head to the Surface.
AllThings.How only says to fill every marked square, without mentioning the straight line; the other four sources all require it. In three sources this is also the station that leads on to the Vanished Station — see Head to the Surface.
Reroute East Park Station
Objective: Reroute East Park Station.
Where: to the southeast, past Perimeter Station. The entrance is at the intersection on the north end of the search area; defeat the group of Hiss and go down the stairs (PowerPyx).
Rule: fill all three taped squares on the platform, then use the Tuning Device (GamesRadar+, PowerPyx, video). The twist is the device itself: used before the squares are full, it teleports you around the station.
Calibration Units:
- Unit 1: upstairs from the platform — in the north store per GamesRadar+, on the right side of the first station level per PowerPyx.
- Unit 2: already on the platform — its south side (GamesRadar+), next to the machine (PowerPyx).
- Unit 3: locked inside a closed shop on the level above, behind a gate. You reach it through the Tuning Device’s teleport.
Placement and power:
- Carry Unit 1 down to the platform and set it down nearby.
- Break the Mold clumps on the platform with melee attacks. They hide the three taped squares.
- Place Units 1 and 2 on the north and south squares by the staircases (GamesRadar+).
- Use the Tuning Device. With a square still empty, it teleports you; repeat until you land inside the closed shop with Unit 3.
- Hit the electrical panel inside (on the left, per PowerPyx) to open the gate from the inside.
- Carry Unit 3 down to the last empty square and use the Tuning Device again.
Success: the device accepts the layout and the station is rerouted. The sources describe no separate signal here.
The sources differ on the teleport. GamesRadar+ places two Units first and is teleported into the shop on the next use. PowerPyx says to use the device “before placing anything” and keep going until it drops you in the right room. In the video the first two uses land in two other spots — “it’s not actually random” — and the third lands next to the Unit.
Head to the Surface / Help the Survivors
Objective: Head to the Surface / Help the Survivors (one step in PowerPyx’s list).
- The way out is gone: PowerPyx says the exit door has turned into a wall. Go up the stairs and interact with the speaker on the wall, and with the wall itself, to tell Zoe you cannot get out.
- Answer the survivors: Dr. Mia Florez broadcasts a distress call over the station intercom (AllThings.How). AltChar puts the intercom on the big concrete block near the stairs; GamesRadar+ says you speak to the survivors through a payphone.
- Take the tunnel: go down the subway tunnel where the spinning wall used to be (PowerPyx) — to the left of the stairs, per AltChar and the video. Defeat the Mold enemies in the first room and follow the tunnel to a new station.
Which reroute leads here is not settled. AltChar, GamesRadar+ and the video take the tunnel straight after Factory Station — AltChar does Factory first, GamesRadar+ and the video do it last. PowerPyx takes it after East Park, its last station. AllThings.How shows Head to the Surface appearing after Factory but then sends you back up to the remaining reroutes, with the Vanished Station last. We have not confirmed what triggers it.
Reroute the Vanished Station
Objective: Reroute the Vanished Station. The station has been pulled out of reality, and you have to calibrate it back.
- Two platforms, two devices: Platform A and Platform B each have a Tuning Device, and using one teleports you to the other (GamesRadar+, VGC, AltChar, video).
- Four Calibration Units, two per platform (GamesRadar+, VGC).
- Platform A first: PowerPyx says Platform A must be calibrated before Platform B can be; every other source also solves A first.
- Mold: powered floodlights grow it, it conducts power across broken cables, and it cannot be cleared while its light is on.
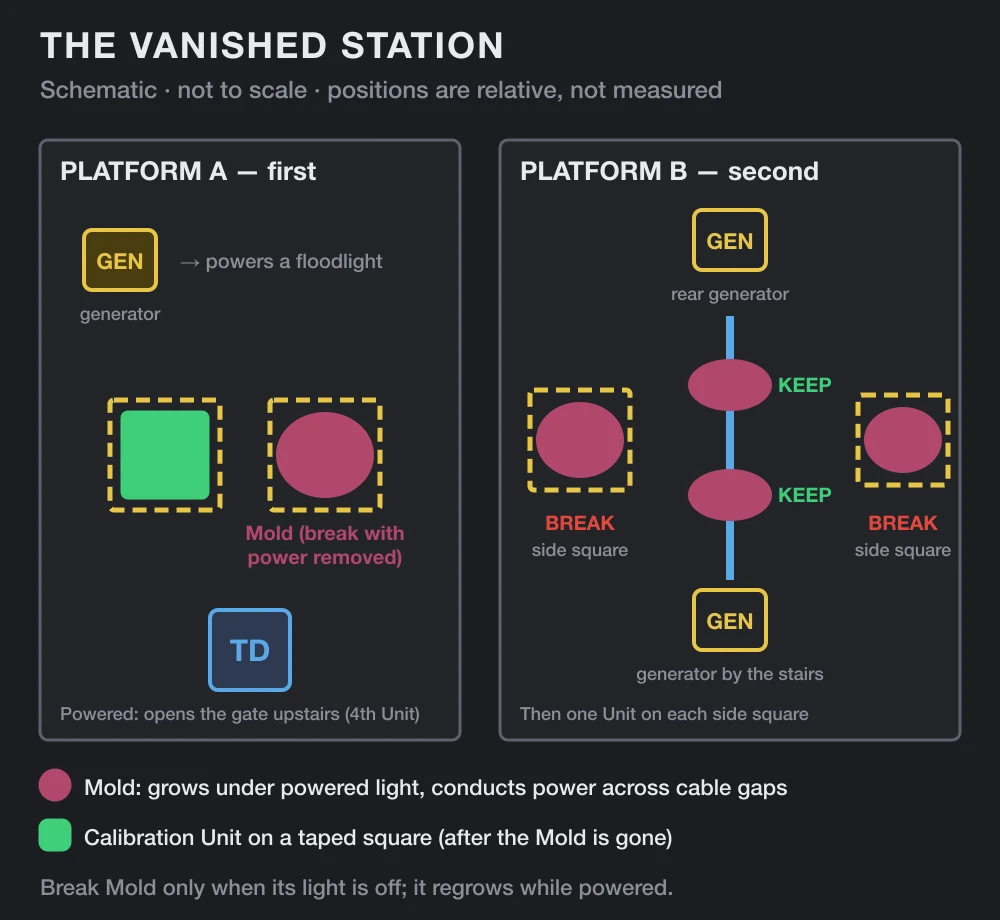
Link the platforms: use the Tuning Device on Platform A once to be teleported to Platform B. Go upstairs and destroy the electrical box next to the shutter door; that opens a walkable path between the two platforms, so you no longer need to teleport (VGC, GamesRadar+). AltChar describes it as a closed door with a blinking red light beside it: smash the light.
| Unit | Where | How to get it |
|---|---|---|
| Units 1 and 2 | The survivors’ room with Dr. Florez, upstairs | A floodlight grows Mold over its shutter. Take the charge out of the Power Core powering that light, then break the Mold (VGC, GamesRadar+, PowerPyx). |
| Unit 3 | A powered room upstairs, opposite Dr. Florez’s room (VGC); GamesRadar+ calls it a shop just to the west | Move the charge to the Power Core by that door. The room also holds a Health Upgrade (PowerPyx, AltChar, video). |
| Unit 4 | Up the stairs from Platform A, behind a shutter (the northern staircase, per GamesRadar+) | Power Platform A’s generator; the shutter opens (VGC, GamesRadar+, PowerPyx, AltChar). |
GamesRadar+’s tip: once you have all four, put two on each platform so you are not carrying them back and forth later.
Two accounts differ from the rest. PowerPyx powers both boxes on Platform B and uses B’s device to reach Platform A, instead of arriving through A; it also says a Unit “will have spawned” in the survivors’ room. AltChar says the generator by the Unit 3 door is already running when you arrive, while GamesRadar+ and PowerPyx have you move a charge there.
Calibrate Platform A
Objective: Calibrate Platform A. VGC calls it the easier platform: two taped squares, one Mold problem.
- Power the platform: bring a charge down to Platform A’s Power Core. That opens the shutter up the stairs to Unit 4, but it also lights a floodlight that grows Mold over one of the two taped squares.
- Take the power away: once you have Unit 4, pull the charge out again and carry it back upstairs to the Power Core by the survivors (GamesRadar+) or by the door (AltChar).
- Break the Mold: with the light off, destroy the Mold on the taped square. It will not grow back.
- Place two Units on the two taped squares.
- Use the Tuning Device on Platform A.
Success: Platform A is calibrated and the next objective, Calibrate Platform B, follows in PowerPyx’s list.
If the Mold keeps coming back, the floodlight is still powered: move the charge back upstairs first (GamesRadar+, VGC).
Calibrate Platform B
Objective: Calibrate Platform B. The power cables on this platform are broken, and only Mold can bridge the gaps. Powered, the platform grows four Mold clumps: two in the middle over the gaps in the cable, and two on the black platforms at the edges of the station, covering the taped squares (PowerPyx).
- Bring two Units to Platform B.
- Grow the Mold: bring power down and connect the generator at the rear of the room. Mold grows over one cable gap and one taped square. Then move the charge to the generator closest to the stairs; Mold covers the second cable gap and the taped square at the other side (VGC).
- Take the power away: carry the charge back upstairs so both generators are off. GamesRadar+ says you can also just keep it in your weapon if you move fast.
- Break only the side Mold: destroy the Mold on the two taped squares at the sides. Leave the two clumps on the cable alone — they carry the power.
- Place the two Units on the uncovered squares and pull the lever on the Tuning Device.
Success: Mold enemies teleport in (GamesRadar+, PowerPyx); AltChar calls it a mini boss. Defeat them.
VGC moves one charge between the two generators; AltChar and PowerPyx have both generators powered together. The goal is the same either way: all four clumps grown, then the power removed. If you break a clump on the cable by mistake, power Platform B’s boxes again to regrow it (PowerPyx).
Talk to Dr. Florez and the reward
Objective: Talk to Dr. Florez. After the fight, go back up to the central area and speak to her again to complete Power Lines (PowerPyx, AltChar, GamesRadar+). VGC adds that you can then leave the subway from Field Office Station.
Reward: one Living Shard (PowerPyx, GamesRadar+, AllThings.How). Picked up along the way: a Health Upgrade in the Vanished Station (see the Unit 3 row above) and, per PowerPyx, a Materials crate at Perimeter Station.
Video walkthrough
Power Lines FAQ
How do you solve the Power Lines puzzles in Control Resonant? At every station, carry the Calibration Units onto the right yellow taped squares and then use the large Tuning Device. Perimeter needs one Unit next to the device and two on the farthest squares; Factory needs three Units in a straight line; East Park needs all three squares filled. The Vanished Station has two platforms, A and B, with two Units each.
Where are the Calibration Units in the Factory Station? One is in the shop or kiosk you pass on the way down to the platform, one is on the roof of the train, and the third is near the platform stairs — GamesRadar+ says behind the north stairs, PowerPyx says through the tunnels under the stairs you came down. Place one at the foot of the stairs and two between the benches so all three form a straight line.
How do you get the third Calibration Unit in East Park Station? Use the Tuning Device before all three squares are filled. It teleports you, and after one or more tries you land inside the closed shop holding the third Unit. Hit the electrical panel inside to open its gate, then carry the Unit down to the last empty square.
How do you calibrate Platform B in the Vanished Station? Power Platform B’s generators to make Mold grow, then take the power back upstairs. Break only the Mold on the two taped squares at the sides of the room and leave the two clumps bridging the broken cables in the middle, because they carry the power. Place two Calibration Units on the side squares and use the Tuning Device.
Which platform do you calibrate first in the Vanished Station? Platform A. PowerPyx says it must be calibrated before Platform B will work, and every other guide we checked solves A first. Power Platform A’s generator to open the gate to a Calibration Unit, then take the power away so you can break the Mold on its taped square.
What is the reward for Power Lines? One Living Shard, according to PowerPyx; GamesRadar+ and AllThings.How also say the quest ends with a Living Shard. The Vanished Station also has a Health Upgrade in the room with the third Calibration Unit.
Conflicts and unverified details
- Station order: PowerPyx lists Perimeter, Factory, East Park; AllThings.How calls Factory the first station; GamesRadar+ goes Perimeter, East Park, Factory, and so does the video (its unnamed first station matches Perimeter). None says whether the order is fixed.
- What sends you to the Vanished Station: Factory Station in AltChar, GamesRadar+ and the video; East Park in PowerPyx. AllThings.How shows Head to the Surface after Factory but puts the Vanished Station after the remaining reroutes.
- Where the Vanished Station starts: most sources arrive on Platform A and teleport to B; PowerPyx goes from B to A.
- Unit locations: the third Factory Unit (behind the north stairs, under the stairs, or left of the train) and PowerPyx’s Perimeter route differ from GamesRadar+.
- East Park teleport: how many uses of the device it takes, and whether you place Units first.
- Platform B power: one charge moved between two generators (VGC) or both powered at once (AltChar, PowerPyx).
- Single-source details: the time limit on carrying the charge at the first station (video), the green light and counter at Perimeter (PowerPyx), the scripted surge and objective change at Factory (AllThings.How), and the payphone (GamesRadar+).
- Names: in-game spelling of Calibration Unit, Tuning Device and Power Core; Field Office vs “Field Command” for the quest start.
Checked against five written guides and one video on September 28, 2026. We have no in-game screenshots for this quest; the diagrams are our own schematics drawn from the sources, and positions the sources do not describe are left out or marked as illustrative. We have not added any solution, reward or fix that is not in those sources.
More Control Resonant guides
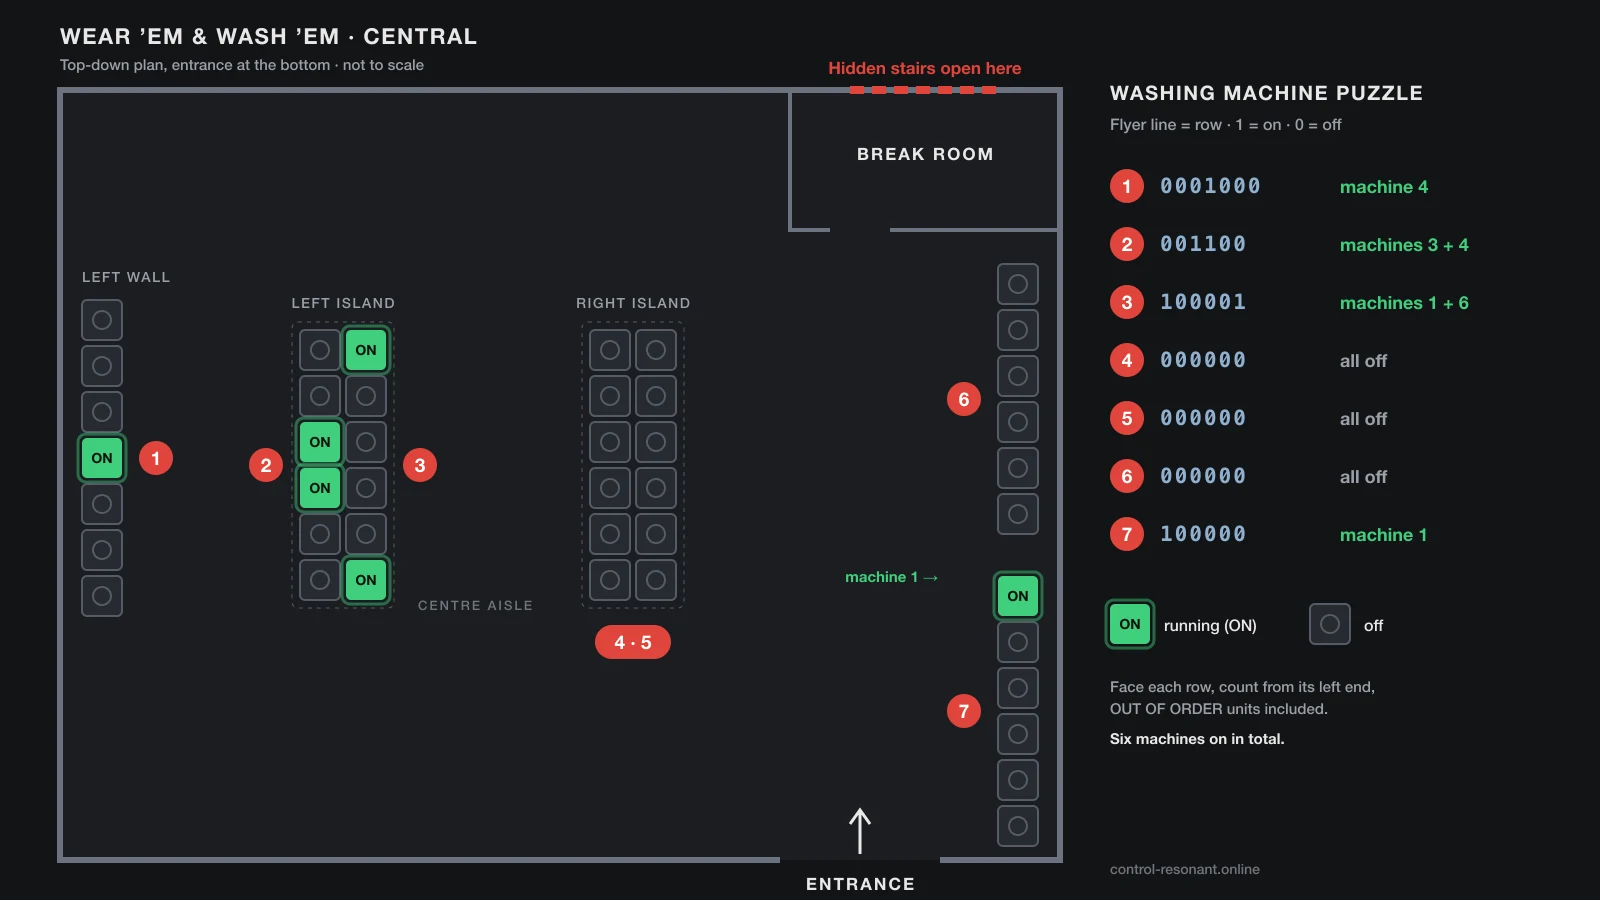
Factory Station sits behind the Patterned Factory, near the alley where the Central cab for The Last Taxi waits. The Mysterious Dog is on a rooftop just north of East Park Station — see the dog toy locations — and for another Central puzzle, the washing machine puzzle opens a hidden shelter with a Health Upgrade. Browse all Control Resonant guides for the rest.
Sources
- PowerPyx — Control Resonant Power Lines Walkthrough (quest start, objectives, every station, reward)
- GamesRadar+ — Control Resonant Power Lines puzzle solutions (Perimeter, East Park, Factory, Vanished Station)
- VGC — Control Resonant Power Lines: Vanished Station Platform A and B puzzle solution
- AltChar — Control Resonant Power Lines quest walkthrough (Factory Station and Stations A/B)
- AllThings.How — The Factory Station reroute in the Power Lines quest explained
- YouTube — Control Resonant Power Lines Puzzle Walkthrough (Reroute Stations)