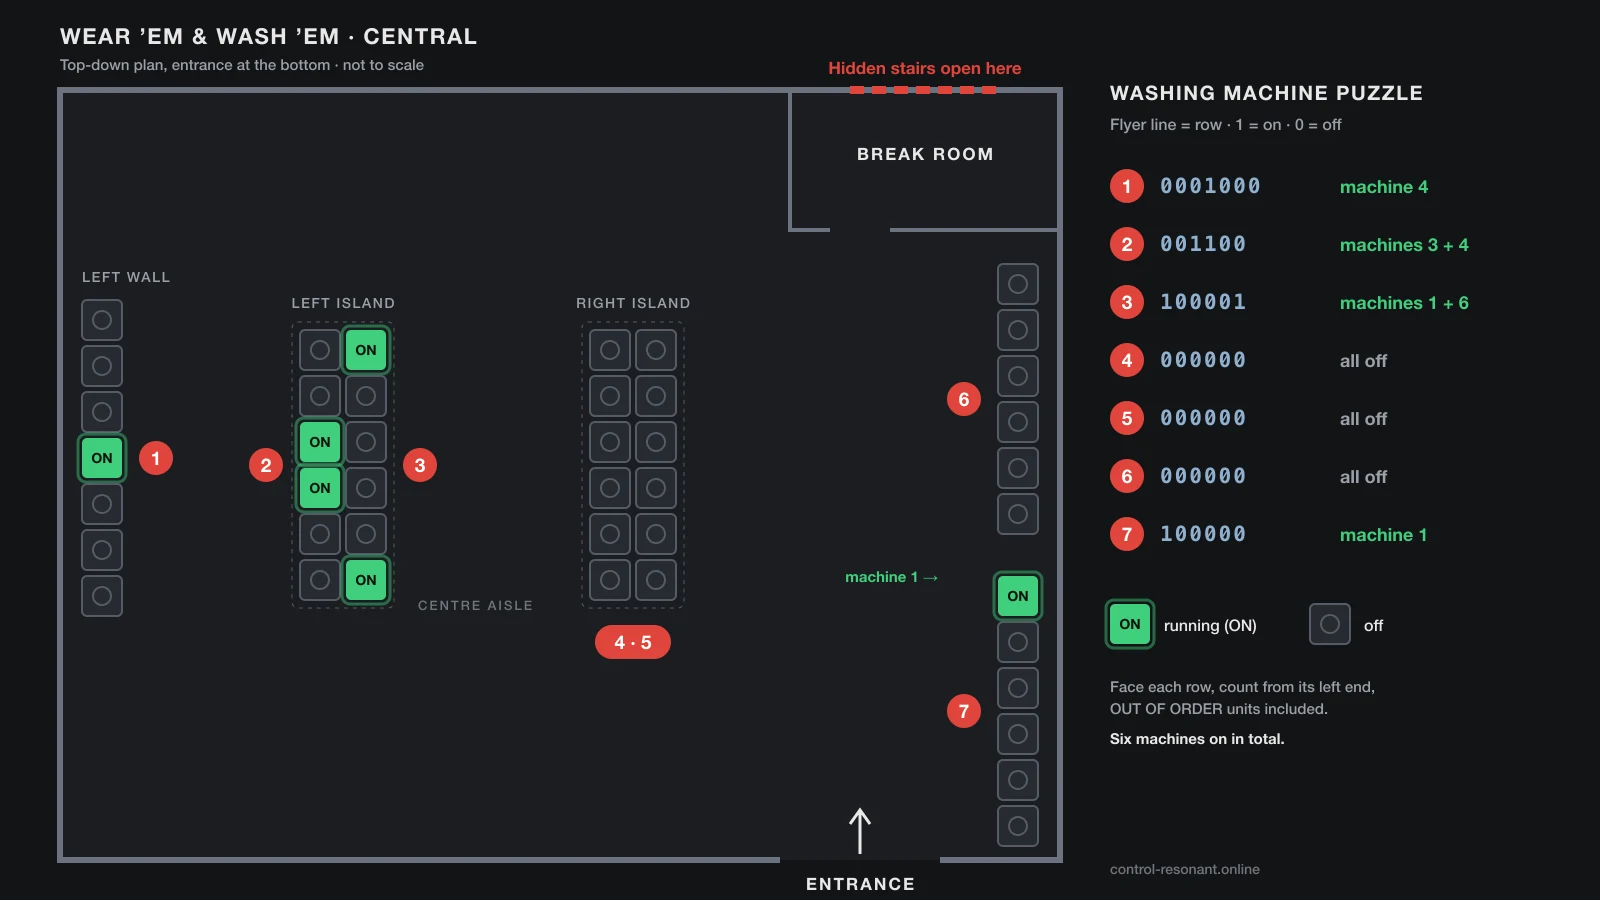
Row-by-row combination
- Row 1Left wall, the long seven-machine bank
- Row 2Left island, the face toward the left wall
- Row 3Left island, the face toward the centre aisle
- Row 4Right island (one of its two faces)
- Row 5Right island (the other face)
- Row 6Right wall, rear section by the break room
- Row 7Right wall, front section by the entrance
Counting direction: rows 1, 2 and 3 read the same from either end (0001000, 001100, 100001), so they come out right whichever side you start from. Only row 7 depends on direction. AllThings.How and Backyard Drunkard both say to switch on its leftmost machine. Facing the right wall from inside the store, the left end of its front section is the machine nearest the back of the store — which fits the video below, where the unit switched on in row 7 is described as “this back unit”. That last step is our reading of the footage, not a statement from the guides.
The guides do not say which face of the right island is row 4 and which is row 5. It does not change the answer: both are all zeros, so every machine on the right island stays off.
Where to find the laundromat
Where: the Wear ’Em & Wash ’Em laundromat is in Central. AllThings.How says to head north from the Field Office and look west of Last Park Station, at the intersection marked with a large resource crate icon. Its vivid blue WEAR ’EM & WASH ’EM sign is easy to spot, and a keyhole symbol is on an outside wall.
The guides place it differently. Backyard Drunkard agrees it is near the Field Office and Last Park Station, around the large plaza in Central; ShowGamer puts it south of Field Office Station, close to East Park Station. Use the blue sign and the keyhole symbol to confirm you have the right building.
Getting in: the entrance is sealed when you first arrive. Three crimson tendrils run out of the doorway, dragging debris around the square. Follow each one to a bulbous Hiss growth and destroy it — AllThings.How and Backyard Drunkard both count three, two of them guarded by Hiss enemies. With all three gone, the barrier drops and you can walk in. ShowGamer simply describes an enemy encounter that has to be cleared first, and says Central opens up fairly early in the story.
Recommended strength: AllThings.How suggests Aberrant Strength 30–35 for the fights around the growths. Backyard Drunkard repeats that figure but stresses it is a comfortable level, not a minimum — the puzzle itself needs no particular strength.
How to read the flyer
A notice board carries two notes. The customer complaint — that no row of machines works perfectly — does not affect the answer. The one you need is the management flyer, titled WHILE YOU WAIT in AllThings.How’s guide and called the Laundry Puzzle note by ShowGamer. It holds seven lines of zeros and ones:
| Line | Code | Turn on | Where the row is |
|---|---|---|---|
| Line 1 | 0001000 | 4th machine (the middle one) | Long row on the left wall |
| Line 2 | 001100 | 3rd and 4th | Left island, facing the left wall |
| Line 3 | 100001 | 1st and 6th (both ends) | Left island, facing the centre aisle |
| Line 4 | 000000 | None | Right island |
| Line 5 | 000000 | None | Right island |
| Line 6 | 000000 | None | Right wall, rear section by the break room |
| Line 7 | 100000 | 1st only | Right wall, front section by the entrance |
What the digits mean: each line is one row of machines and each digit is one machine in that row: 1 means running, 0 means off. Backyard Drunkard’s warning is worth repeating — it is not a number to convert from binary, just a switch pattern.
Which row is which: facing the machines, the top line is the far-left row and the bottom line is the row nearest the store’s front-right corner (AllThings.How). ShowGamer phrases it as the first row on your left when you walk in, and the video starts from “the longest row” — the same seven-machine bank.
Where the board hangs is reported both ways: AllThings.How and ShowGamer put it beside the entrance or near the open doors, while Backyard Drunkard and the video put it at the back of the room. Either way, the code on it is the same.
Step-by-step solution
- Clear the floor first: switch off any machine that is already running. The door only reacts when all seven rows match at the same moment, and in the video a machine in the final row was already running before the player reached it.
- Row 1 (0001000): at the seven-machine bank on the left wall, switch on the fourth machine — the one in the middle. Nothing else in this row.
- Row 2 (001100): on the left island’s face toward the left wall, switch on machines 3 and 4, the central pair. Leave both outer pairs off.
- Row 3 (100001): on the same island’s face toward the centre aisle, switch on machines 1 and 6 at the two ends. The four in between stay off.
- Rows 4, 5 and 6 (000000): touch nothing on the right island or the rear of the right wall — just check that none of those machines is running.
- Row 7 (100000): finish at the front section of the right wall, by the entrance. Switch on only its first machine from the left — facing the wall, the end nearest the back of the store.
You can see a machine is running when its lights are on; AllThings.How says to go by each machine’s own green or amber console light rather than the room lighting. The same guide adds that most units are marked OUT OF ORDER and cannot be switched, but each still counts as a position in its row. There is no master switch, lever or confirmation prompt.
Hidden shelter and reward
What opens: as soon as the last required machine starts, the wall at the back of the break room opens by itself and reveals a staircase leading down. No countdown, no prompt. The video shows the same thing: the secret door at the back opens the moment the final machine goes on.
What is down there: the stairs lead to a basement corridor and a storage room full of beds. A chest in that room holds a Health Upgrade Point, the main reward. Two files lie along the left side of the corridor: Visitation And Stay Protocol and Do Not Leave The Shelter, which explain the shelter’s rules. All three written guides and the video mention the Health Upgrade; AllThings.How and ShowGamer name the two files, and Backyard Drunkard also counts two. AllThings.How says the lower area holds nothing else.
Why it matters: according to AllThings.How, three Health Upgrade Points permanently raise Dylan’s maximum health, and this bunker is one of six Secret Hideouts across the game’s zones — clearing all six earns the Backroom Espionage trophy. The other guides do not mention the hideout count or the trophy.
If the back wall stays closed
- Rows 4, 5 and 6 must be silent. A single machine running on the right island or the rear right wall keeps the door shut.
- Count OUT OF ORDER machines. They cannot be switched on, but each takes up a digit in its row, so include it when counting positions (AllThings.How).
- Check row 7 again. It is the only row where counting from the wrong end gives a different machine. The right one is the first on the left as you face the right wall.
- Trust the machine, not the room. Judge each unit by its own console light, not the ambient lighting.
- Order does not matter. Backyard Drunkard says the game only checks the finished arrangement, so switch off a wrong machine and carry on — no need to reset the whole floor.
If rows 1 to 3 look right but the wall stays shut, AllThings.How says the cause is either a wrong machine switched on or a working machine in rows 1 to 3 still off.
Video walkthrough
Washing machine puzzle FAQ
What is the washing machine puzzle solution in Control Resonant? Switch on machine 4 in row 1, machines 3 and 4 in row 2, machines 1 and 6 in row 3 and machine 1 in row 7, and keep every machine in rows 4, 5 and 6 off — six machines running in total. The flyer’s seven lines read 0001000, 001100, 100001, 000000, 000000, 000000 and 100000, where 1 means on and 0 means off.
Which row of washing machines is row 1? The long seven-machine bank on the left wall. Looking into the store from the entrance, the flyer’s top line is the far-left row and its bottom line is the row nearest the store’s front-right corner, beside the entrance.
Where is the laundromat puzzle in Control Resonant? At the Wear ’Em & Wash ’Em laundromat in Central, close to the Field Office; look for its bright blue sign. The guides disagree on the nearest station — AllThings.How and Backyard Drunkard say Last Park Station, ShowGamer says East Park Station. Destroy the three Hiss growths feeding the red tendrils outside to open the door.
What is the reward for the washing machine puzzle? A Health Upgrade Point in a chest in the hidden shelter below the laundromat, plus two files: Visitation And Stay Protocol and Do Not Leave The Shelter. AllThings.How says the shelter is one of six Secret Hideouts, and clearing all six earns the Backroom Espionage trophy.
Why won’t the secret door open? Usually a machine in rows 4, 5 or 6 is still running, or a row has been counted from the wrong position. Switch off anything that was already running when you arrived, count OUT OF ORDER machines as positions, and judge each machine by its own console light.
Does the order you switch the machines matter? No. Backyard Drunkard says the game checks the finished arrangement, not the order, so a wrong machine can simply be turned off again. There is no prompt or timer: the wall opens as soon as all seven rows match.
What we have not verified yet
- The exact location: the guides name different nearby stations (Last Park vs East Park) and different directions from the Field Office.
- Where the notice board hangs: by the entrance in two guides, at the back of the room in the third guide and the video.
- Which face of the right island is row 4 and which is row 5. The answer is the same either way.
- How many machines in each row are OUT OF ORDER, and which ones. Only AllThings.How mentions them.
- The green or amber console lights, the three-upgrade health rule, the six Secret Hideouts and the Backroom Espionage trophy each come from AllThings.How alone.
Checked against three written guides and one video on September 27, 2026. We do not have our own screenshots of the laundromat yet; the plan at the top of this page is our own diagram drawn from those sources, and machine counts per row follow the digits on the flyer.
More Control Resonant guides
Still in Central? The Mysterious Dog waits on a rooftop just north of East Park Station — see the dog toy locations for her dragon toy — and the Central taxi for The Last Taxi is in an alley near the Patterned Factory. For everything else, browse all Control Resonant guides.
Sources
- AllThings.How — Control Resonant: How to Solve the Wear ’Em & Wash ’Em Washing Machine Puzzle
- ShowGamer — CONTROL Resonant: the Wear’Em & Wash’Em washing machine puzzle
- Backyard Drunkard — Control Resonant Central Laundromat Washing Machine Puzzle Solution
- YouTube — Laundry Puzzle (Central) - Control Resonant (full solve, door opening and Health Upgrade)